%3F.png)
How to migrate from Universal Analytics to Google Analytics 4
On 1 July 2024, Universal Analytics, Google’s flagship analytics platform, stopped working and was replaced with Google Analytics 4. If you want to continue tracking and collecting website data, migrating from Universal Analytics to Google Analytics 4 is essential. This guide breaks down the process step by step, making the transition easy
Why you need to migrate from UA to GA4
If you don’t migrate to Google Analytics 4 (GA4), you won’t be able to track or analyse your website or app data, leaving you completely oblivious to your website’s performance.
This is particularly dangerous if you have a website you actively promote.
Or if you do any kind of digital marketing activities that involve sending users to your website.
It doesn’t matter whether it’s something as small as having your website address on your business cards, putting your website address on your flyers, brochures and billboards.
This applies whether you use SEO, PPC, or any other digital marketing strategy to drive traffic.
No matter what the activity is, you need to know exactly what users are doing when they reach your website.
This will allow you to spot traffic trends, identify potential issues and opportunities to improve your website’s ability to promote your business.
One of the most reliable ways to do this is by installing GA4 onto your website and having Google tell you what users are doing after reaching your website.
Step-by-step guide to migrating from UA to GA4
Now that we’ve explained why you need to migrate from UA to GA4 as soon as possible, here are the steps you need to follow to move from UA to GA4.
Step 1: check if you have GA4
Before you start the migration process, it’s key that you first check whether you already have a GA4 account and whether it’s working.
Why?
Because if you didn’t move from Universal Analytics to GA4 in 2024, Google probably automatically created a GA4 property for your website.
Google did this for most websites that didn’t migrate before UA officially stopped working on 1 July 2024.
So, start by checking if you have a GA4 property.
Follow these steps:
Use Google Tag Assistant to find your Google Analytics Measurement ID
The first step to take is to find out what your Google measurement ID is.
A Measurement ID is a unique identifier that connects your website to Google Analytics, helping you manage your tracking setup.
Measurement IDs always start with a G - and are followed by 10 characters after G - (numbers and letters).
For example - G-R1S17E0DGZ
Knowing your Google measurement ID will allow you to identify the different tracking tags installed on your website and most importantly find the Google Analytics property linked to your website in Google Analytics.
To find your website’s measurement ID, use a tool called Google Tag Assistant.
Go to Google Tag Assistant
Open your preferred browser and go to Tag Assistant.
To do so, simply copy this address in the search bar ‘https://tagassistant.google.com/’
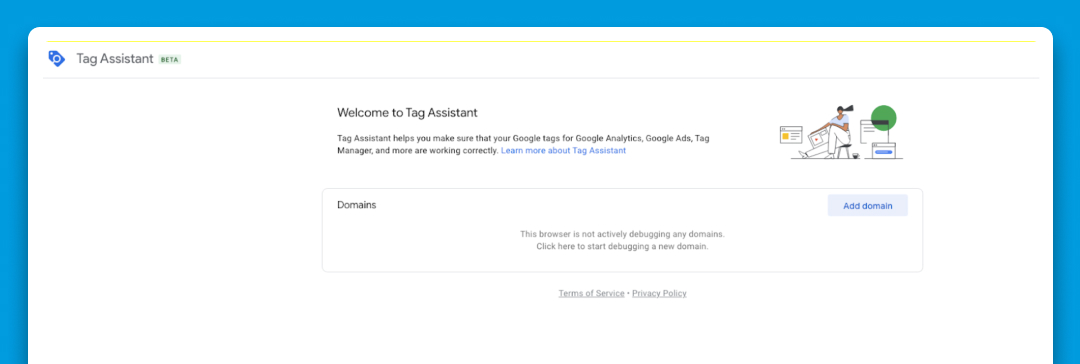
Once you are in Tag Assistant, click ‘Add domain’ and type in your website’s address and click ‘Connect’.
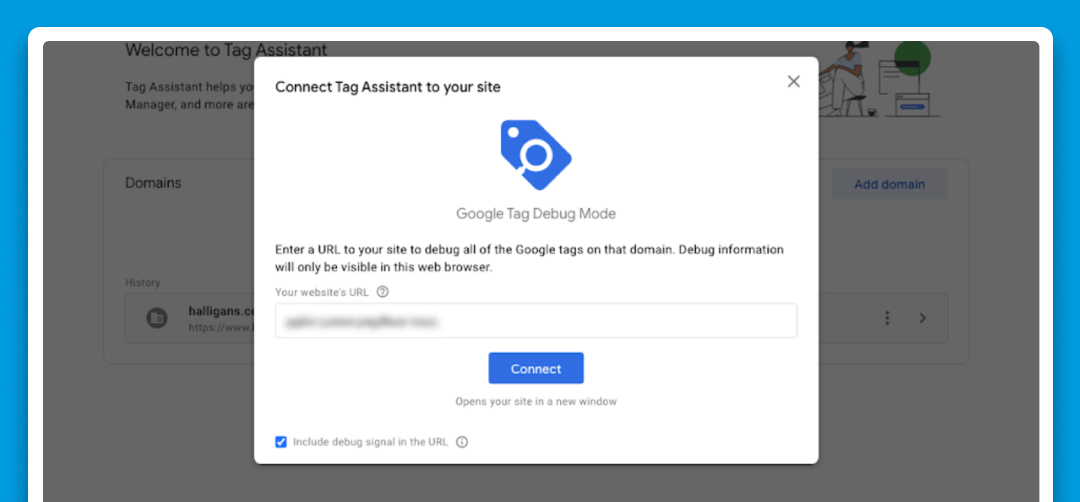
After clicking ‘Connect’, two new tabs will open.
- One will show your website in preview mode with a message towards the bottom right of the window.
- Another tab for Tag Assistant, showing the preview console
You will likely be automatically redirected to the tab with your website in preview mode first.

Once your website has fully loaded, locate and click on the Tag Assistant tab, which is the other tab where the preview console is.
Look for Google Analytics tags
In the preview console, look for tags with the Google Analytics icon. If you see them, it confirms that Google Analytics is installed on your website. In that case, continue following this guide.
However, if you don’t see any tags with the Google Analytics icon (as shown in the example below), it likely means Google Analytics isn’t set up on your site.

If that’s the case, skip this section and scroll down to the part of the guide where I’ll explain how to create and install a new Google Analytics property to start tracking your website data from scratch.
Click here to skip to the section explaining how to create and install a new Google Analytics 4 property.
.jpg)
Once you’ve found a tab with the Google Analytics icon, open this tab.
All you have to do is look for a tab with the Google Analytics icon next to it, with a Google Measurement ID starting with ‘G-’.
Here’s how to find your Google Measurement ID
How to find your Google Measurement ID in the Tag Assistant preview console
If you haven’t manually migrated from Universal Analytics (UA) to GA4, Google likely created a GA4 property for your website automatically.
Next, locate your GA4 Measurement ID.
Here’s how to find it:
1. Open the Tag Assistant preview console:
Look for a tag in the top row that starts with G- followed by 10 characters (a mix of numbers and letters).
For example: G-R1S17E0DGZ.

2. View the tag details:
Click on the tag to open a detailed summary view. This view provides additional information about the tag, including a section labelled ‘Source’.
Refer to the image below to see how the summary view looks.
.jpg)
3. Identify the source:
If you see something like ‘Connected site tag of t10_UA-125991416-1’ under the ‘Source’ column, it means the GA4 property was automatically created by Google.
This happens when you didn’t migrate to GA4 manually before the deadline, but it’s nothing to worry about; don’t panic!
4. Be aware of potential data issues:
Keep in mind that auto-migration may result in incomplete or incorrect data, depending on the complexity of your website. For accurate tracking, it is recommended that you:
- Manually review your GA4 setup to ensure everything is configured correctly.
- Remove your UA tag from your website to prevent duplicate tracking and replacing it with your GA4 tag. (If you can’t access your website’s code; ask a developer to do this for you)
5. Copy and save your Measurement ID:
Once you locate your GA4 Measurement ID (e.g., G-R1S17E0DGZ), copy it and save it in a secure location for future use.
This will be needed later to complete your GA4 setup.
How to locate your GA4 property using your Measurement ID
This section explains how to quickly and easily find your Google Analytics 4 (GA4) property using your unique Measurement ID.
1. Go to Google Analytics and sign in

To access Google Analytics, open your preferred browser and in the address bar, copy and paste https://analytics.google.com.
If you’re using a Google-owned web browser like Google Chrome and are signed into the Google account associated with your website’s Google Analytics account, you’ll likely immediately be signed into your Analytics account.
But if you’re not, you’ll be redirected to the Google Analytics sign in page.
Once you are there, simply enter the Google email address and password that’s associated with your website’s Google Analytics account and click ‘next’.
2. Look for a GA4 property that’s linked to your account
After logging into your Google Analytics account, the next step is to find the GA4 property associated with your website.
Here’s how:
1. Retrieve the Google Analytics Measurement ID you found earlier using Google Tag Assistant.
2. Copy the Measurement ID and paste it into the search bar at the top of your Google Analytics 4 interface.
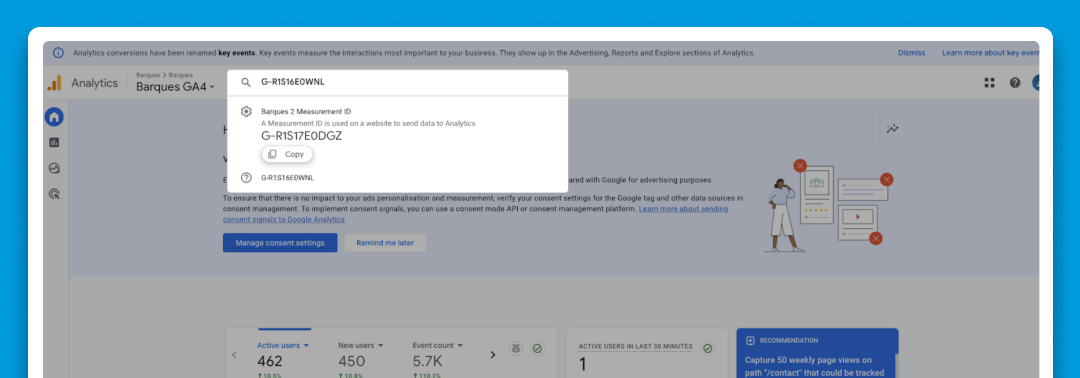
This will help you quickly locate the property connected to your website, saving you time and ensuring you’re working with the correct data.
This will take you to the Google Analytics 4 account installed on your website.
Once it comes up, click on the property displayed in the search bar, this will take you to the web stream details.
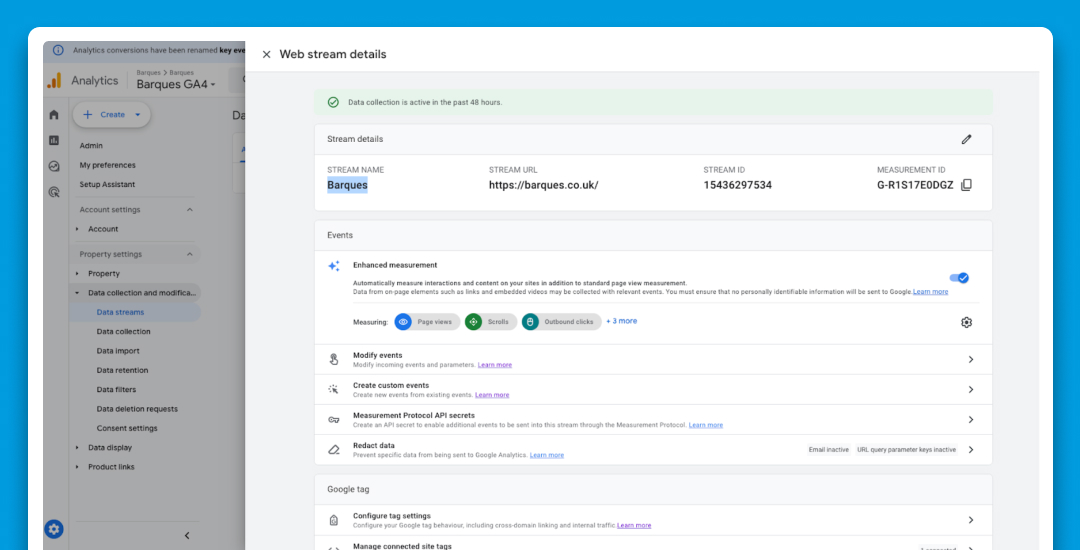
3. Check if GA4 is tracking your data
After clicking on the property displayed in the search results and being directed to the web stream details. The next step is to check the reports to see whether your GA4 property is working
4. Check the reports:
- Click the home icon in the left-hand menu of the GA4 interface.
- Explore some of the reports displayed on the home page.
5. Look for active tracking:
- Check whether the reports show user activity or traffic for the last 90 days. If the charts aren’t blank and data is being tracked, your GA4 property is active and working as expected.
- For example, in the report below, you can see traffic being tracked, confirming that the GA4 property is functioning correctly.
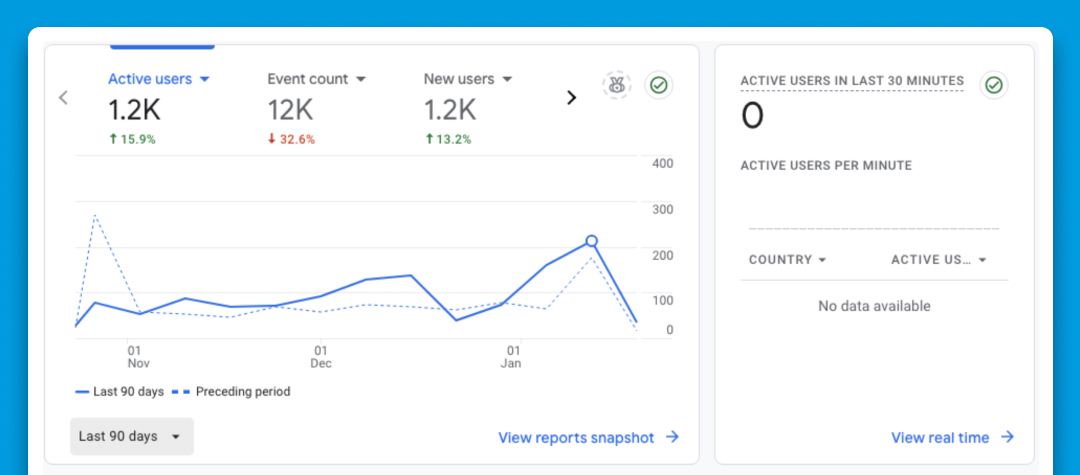
You can also click on ‘Reports’ in the sidebar menu and review your individual reports to ensure you have access to all the data you need.

What if data isn’t being tracked?
If you don’t see any data or the reports are blank, it means GA4 is not properly set up on your website. In this case, follow the next section of the guide to create a new Google Analytics 4 property and install it to start tracking your website data.
If your data isn’t being tracked, follow the guide below to create and install a new Google Analytics 4 property for your website.
Re-install Google Analytics 4 and delete your old Universal Analytics tracking code
The final step is optional, but I’d recommend deleting the Universal Analytics tracking code from your website and replacing it with the Google Analytics 4 (GA4) tracking code.
Why should you replace the UA Code?
Automatically created GA4 properties come with basic event tracking, but customising the setup ensures it meets your website's specific needs.
So, take out the UA code to keep tracking clean, avoid confusion, and make sure your data stays accurate.
How to install your GA4 tag
1. In the GA4 interface, navigate to: ‘Admin’ > ‘Data Streams’ > Select your relevant data stream.
2. Once the Web Stream Details page opens, scroll down to the ‘Google Tag’ section and click on ‘View Tag Instructions’.
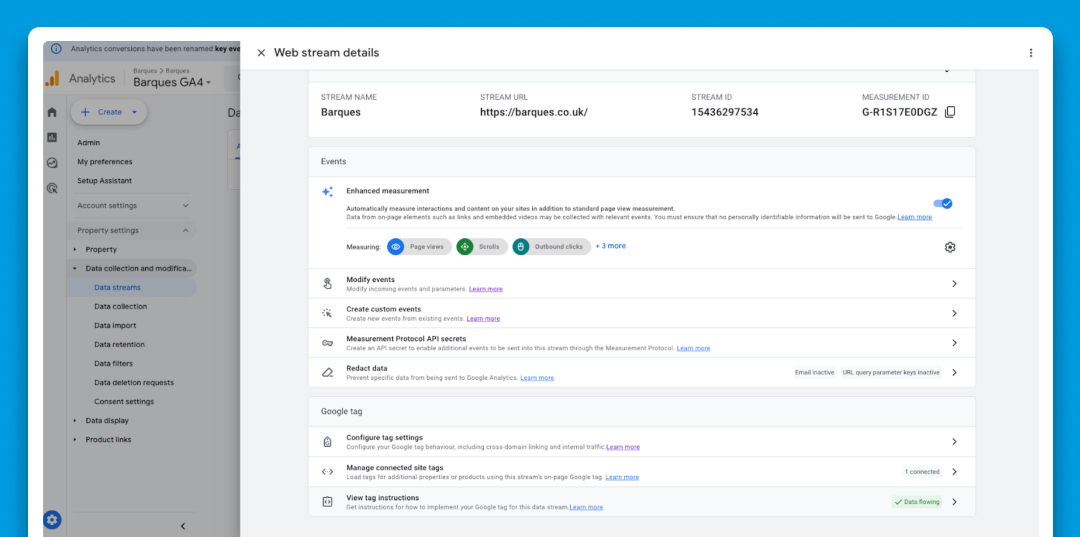
1.Under installation settings:
2.Click ‘Install Manually’.

3.Copy the provided code snippet.
4.Paste the GA4 tag code into the <head> section on every page of the website
Need help? let us handle it
If you’re unsure how to implement these steps, we’re here to help. At Barques, a trusted digital agency in Birmingham, we have plenty of experience in:
- Setting up Google Analytics 4 (GA4).
- Completing Universal Analytics to GA4 migrations
- Configuring it to meet your needs.
- Fixing tracking issues to ensure accurate reporting.
We can do all of this for you, saving you time and hassle so you can focus on your business.
Contact us today
Fill in our contact form and tell us what you need. One of our team members will be in touch quickly to get things sorted for you.
Leave your analytics to us, and we’ll make sure it’s set up right.
If you’ve followed the earlier steps and found that Google hasn’t automatically created a Google Analytics 4 (GA4) property for your website.
Or if you’ve never had Google Analytics installed; don’t worry.
Whether the Tag Assistant didn’t detect any Google tags on your website, or your current setup isn’t working, you’ll need to create a brand-new GA4 property.
The guide below will walk you through setting up GA4 from scratch and getting your website ready to collect data.
However, If you notice that you haven't automatically been moved to GA4 for whatever reason, the guide below will show you how to create a new GA4 property from scratch and begin capturing your website data.
How to add GA4 to your website
To add the new GA4 tag to your website, there are several simple steps to follow, the first one being setting up a new GA4 account if you don’t have one already.
If you have a GA4 account, skip these steps below and create a GA4 property.
Set up a new GA4 account
Setting up a new Google Analytics 4 (GA4) account is simple.
Follow these steps to get started:
1. Go to admin settings
- Log in to Google Analytics.
- In the left-hand menu, click the Admin gear icon.
- Select ‘Create Account’ to start setting up your new GA4 account.
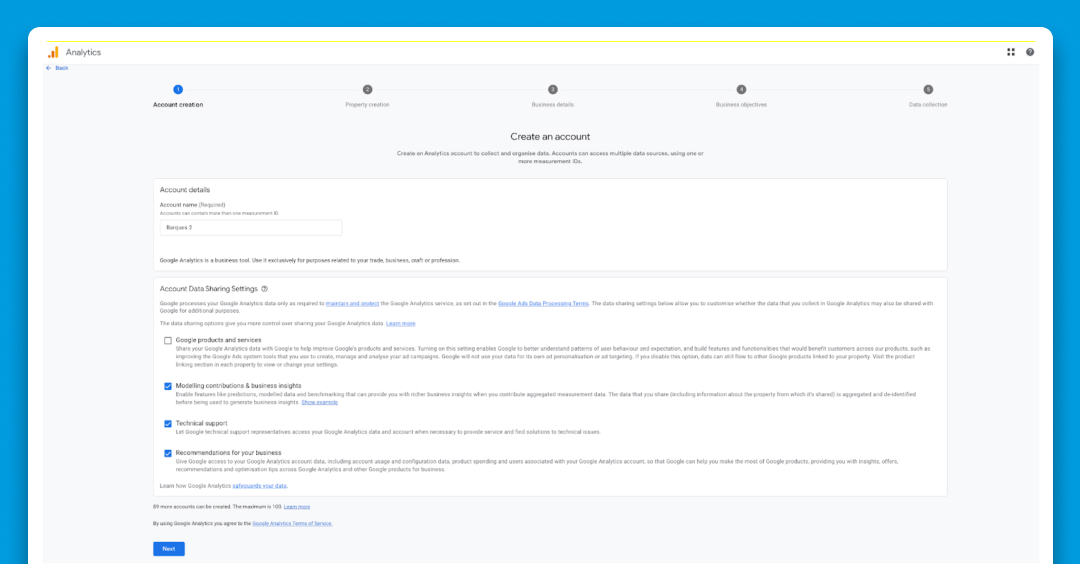
2. Enter account information
- Provide the necessary details, such as your account name.
- Click Create to move on to the next step.
3. Create a GA4 property
You’ll then be prompted to create a property.

A property is like a container for your website’s data.
If you manage multiple websites, you can create separate properties for each one, all under the same account for easy access.
4. Enter business details
- Fill in details about your business or organisation,
including:
- Business name.
- Industry category.
- Time zone and currency.
Answer the setup questions about your business objectives as accurately as possible.
5. Accept Google’s terms
Review and accept Google’s Data Processing Terms to proceed.
6. Set up a web stream
- Enter your website’s URL and give your data stream a name.
- Tip: Use the same name as your website to keep things simple and avoid confusion later.

7. Install the GA4 tag
- Once your web stream is created, you’ll be shown the GA4 tag. This is the tracking code you need to install on your website to start collecting data.
Follow the instructions provided below to install the tag onto your website.
How to Install Google Analytics 4 onto your website
The final step in setting up Google Analytics 4 (GA4) is installing it on your website.
There are a few methods you can use, depending on your website’s platform and your familiarity with editing code.
Option 1: add the GA4 tag manually
If you know how to edit your website’s source code:
- Copy the GA4 tracking tag from your Google Analytics account.
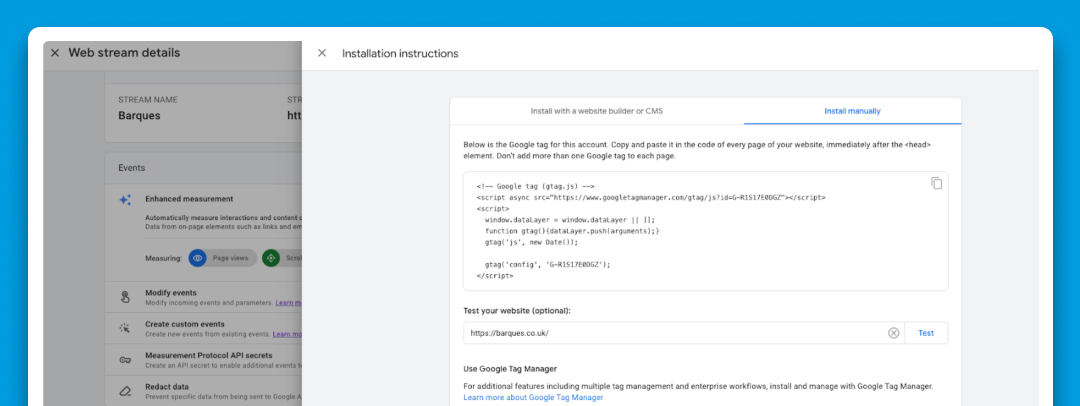
- Open your website’s source code in your code editor or CMS.
- Paste the tag in the <head> section of every page, immediately after the <head> element.
- Save your changes and upload the updated files to your server.
If this sounds too technical, you may want to try one of the other methods below.
Option 2: use Google Tag Manager
Google Tag Manager (GTM) allows you to install GA4 without directly editing your website’s code.
Here’s how:
1. Log in to Google Tag Manager
2. Create a new GA4 Configuration Tag.
3. Add your GA4 Measurement ID.

3. Set the tag to trigger on all pages.
4. Publish your changes.
GTM is a powerful tool, but it may be challenging for beginners unfamiliar with website management.
Option 3: use a WordPress plugin
If your website is built on WordPress, the easiest way to install GA4 is by using the Site Kit by Google plugin.
How to check if your website uses WordPress:
Visit BuiltWith and enter your website’s address. It will tell you if your site is powered by WordPress.
How to add Google Analytics 4 to WordPress
If you have a WordPress website, you can install Google Analytics 4 to your WordPress website using a plugin called 'Site Kit By Google', to do this, follow these steps:
1. Log in to your WordPress admin dashboard.
2. Go to Plugins > Add New.
3. Search for Site Kit by Google and click ‘Install Now’.
4. Activate the plugin.
5. Follow the setup wizard to connect your Google Analytics account.
The plugin will automatically add your GA4 tracking code to your website.
I’ve embedded a video below showing you how to install Google Analytics 4 onto your WordPress website using Site Kit by Google Analytics.
So simply follow the instructions mentioned in the video below.
How to install Google Analytics 4 onto your website if your website doesn’t use WordPress
If your website isn’t built using WordPress, you won’t be able to use the Site Kit plugin to install Google Analytics 4 (GA4).
Instead, you’ll need to manually add the GA4 tracking code to the <head> section of your website.
Here’s how:
1. Find your GA4 tracking code
As I mentioned earlier on in the article, the first step to installing GA4 onto your website and beginning to track data is to find your GA4 tracking code in Google analytics.
Here’s how to do this:
1. Log in to Google Analytics.
2. Go to the Admin section for your GA4 property.
3. Under the Property column, click Data Streams.
4. Select your website’s data stream.
5. On the Web Stream Details page, scroll down to the Google Tag section and click View Tag Instructions.
6. Under Install Manually, you’ll see your tracking code. Copy the entire script provided.
Step 2: Add the GA4 tracking code to your website
For websites built with HTML or other platforms:
1. Open your website’s code - Access your website’s source code using a code editor or content management system (CMS).
2. Locate the <head> section - Find the <head> section in the code of every page you want to track.
3. Paste the GA4 tracking code - Insert the code snippet directly into the <head> section.
Example:

4. Save and upload - Save your changes and upload the updated files to your server.
Once this is done, your GA4 account will be connected, and you’ll start tracking valuable data from your website.
What to do if you can’t access your website’s code?
If you’re unable to make changes to your website’s code, there’s no need to worry. The best solution is to get help from a web developer.
Here at Barques, our experienced web development team can set up Google Analytics 4 for you, ensuring it’s properly configured to meet your needs.
We can also provide ongoing maintenance to keep your website running smoothly and up-to-date.
Contact us
Get in touch with us to see how we can help. Whether it’s setting up GA4 or resolving other website issues, we’ll handle it so you can focus on growing your business.
Advantages of GA4 over Universal Analytics
Now that we’ve gone over the necessary steps to install Google Analytics 4 on your website, let’s take a closer look at the advantages that GA4 has over Universal Analytics.
GA4 uses an event-driven model unlike UA
Google Analytics 4 (GA4) tracks user activity in a more granular and detailed way compared to Universal Analytics.
Instead of grouping user activity into sessions (blocks of time spent on your site), GA4 tracks the individual actions that users perform after arriving on your website.
These actions could be anything from viewing pages on your website, scrolling through pages or clicking on certain links.
Irrespective of what the action is, each action is tracked as an “Event”.
This approach allows you to pinpoint exactly how users are engaging with your website.
With GA4, businesses can track important actions like email clicks and form submissions.
On the other hand Universal Analytics (UA) had a session-based model, which grouped user activity into “Sessions”.
A session is simply the amount of time a user spends on your website. A session begins when someone visits your site and ends either after 30 minutes of inactivity or at midnight.
Within these sessions the same events were tracked, but the only difference being that UA tied them to sessions rather than tracking them as standalone events.
Cross-platform and multi-device insights
One big plus of GA4 is that it tracks users across different devices.
But how does that work?
If a user starts browsing your website on their phone, then switches to their laptop.
GA4 will pick this up and pair these interactions, giving you a complete view of their journey despite them using two different devices.
GA4 achieves this using tools like User-ID Tracking and Google Signals, which access data from users who are signed into their Google accounts.
Combined, these two features give you a more complete view of user journeys, in comparison to the relatively basic tracking capabilities Universal Analytics offered.
AI-Powered analytics and predictions
While multi-device user tracking and event-based tracking are huge improvements that show how much of an upgrade GA4 is to UA.
Another great feature GA4 has which its predecessor lacked is the ability to forecast future user behaviour based on existing data.
GA4 helps predict user behaviour like:
- Who's most likely to buy.
- Who might stop engaging with the website.
- Which audiences could produce the most revenue.
It does this by leveraging AI and machine learning algorithms to observe future data trends.
Start using GA4
By now, if you've followed these steps, your GA4 setup should be ready to start collecting data.
Taking the time to set it up properly ensures you get the insights you need to grow your business.


